Tuesday 20 September 2011

Bob Version 2.0

So that last armature I made was a little... let's say "sketchy"... but for all it's flaws, it was a good starting point.

After getting my dimensions a bit more down to earth (trust me, you never appreciate how small 28mm really is until you take a ruler to a mini), I set about clipping some more wire and digging out the soldering iron to make myself a "proper" armature.

My soldering iron was missing the end and after a long look I made my own... It did not work...


Given what I had at my disposal it was ok, but the heat didn't make it to the end, which was pretty useless. So I bit the bullet and waited A WHOLE DAY to go to the shop and buy a new one.(soldering iron that is, why not eh?).

I also picked up a couple of crocodile clips with which to make this...


Soooooo,,,,,

Clip, Cut, Solder Solder...


but alas... Bob 2.0 turned out a little on the tall side, but after some measuring it seemed he was only long in the leg, so with a bit of clever wire bending...


and BINGO was his name-OH!

nrxt comes polymer clay muscular layer and rough shaping... ooooooh yeeeeah!

Stay Tuned :)

Friday 16 September 2011

A Matter of Great Ambition...

So I've been thinking of trying my hand at a little sculpting, so a quick trip to the shops and...


I also grabbed myself some heavy duty wire cutters as the wire I'll be using for my armatures is fairly strong (didn't want it snapping every time I bent it into place), but still thin and bendy enough to be usable.

After a LOT of Googling for info on sculpting from scratch, I decided to go for a polymer clay instead of an epoxy (greenstuff, milliput etc.). I'm not unfamiliar with using GS, but I wanted something that would give me a bit more working time (and also be non-toxic so I can sculpt whilst the kids are awake... which is always).

My clay of choice was, after a bit more Googling, was Sculptey. It's a bit more malleable than Fimo (so I'm lead to believe), and my choice of Sculptey III and Sculptey Premium was decided for me by what my local toy shop had in stock.


A bit of bending, twisting, clipping and gluing later...


This is Bob, my first attempt at making an armature.

Admittedly he's not the best in the world, but the dimensions are pretty much how I want them, I think it may turn out to be 30mm "heroic scale", once built up, rather than the standard 28mm, and I have no doubt that there will probably be Bob's MKII's, MKIII's and so on until I get it right.

Bare in mind this is my first attempt at sculpting a figure, and I am under no illusions, it's gonna get ugly. Whilst I may have Michaelangelo's David in my mind, I know I'm probably going to be looking at something a bit more like Nick Park's Morph.


... and you know what? That's fine by me. The purpose of this is to hone my skills, learn new techniques and slowly and surly develop my talents as an artist, rather than to rush in expecting perfection and give up after my first failed attempt.

With that said... wish me luck, and next time we'll see Bob with a bit more flesh on him once I've finalised my plans as regards to what it is exactly that I'm going to sculpt. (I'm thinking Pirate, but I'm not 100% sold on it yet).

- Dave :)


Friday 9 September 2011

And the Winner is?....

So what have I been up to lately?

The answer, I'm sad to say... not a lot (modelling wise anyway).

My Rumble and Stumble entry was (as I expected) beaten by the Big Mek, and rightly so... but I can rest assured that if I were one of those people to vote for themselves (and not for the mek as I did), then I would have been the victor, so I'm happy with that.


the winning mek

As for recent endeavours... I'm hoping to get some paint to plastic soon, I've got my eye on some Mantic Games minis (lovely looking undead hordes to be exact).

Can't say much more than that for now, but I just wanted to let those of you that may be interested, know how I faired in my first ever painting comp

Take it easy, and hopefully a new pic heavy blog will be heading your way soon enough :)

Monday 15 August 2011

Rumbling and Stumbling

So it's been a week since my last post, and a pretty slow one at that modelling wise.

HOWEVER... [insert dramatic music]

I managed to find a few hours yesterday to knock up an entry for the latest painting comp over on astro' "The Return of Rumble or Stumble" It was some of my fastest painting ever, as I entered on the closing date itself, but it was fun and I'm fairly happy with my entry, and believe it or not, this is the first painting competition I've ever entered (with the exception of a games day banner comp I entered when I was 14 in which I came 6th)

I'm not really in it for the winning (my vote went to the Big Mekk), I know my limits painting wise, but I did it more for the motivation. And now I know how quickly I can turn out a biker I may finish the rest of them when I get a minute.

Anyway... here's a selection of pics of the fella all based and ready for action.


Sunday 7 August 2011

Back to the Drawing Board

So I painted up the stripes on the ol' dozer blade, and to in all fairness, it looked pants.

There was little to no contrast between the stripes and the star, the whole thing was far too busy and just didn't work at all... but hey ho... you win some you loose some.

As a result I've repainted the whole blade in nice new coat of weathered bronze and I'm quite happy with the results.


I think it looks much better, and as I didn't take any pictures of the yellow and black atrocity (I painted straight after it) you'll have to take my word for it.

Before I added the extra layer of bronze over the verdigris it looked even better (IMHO), like an actual piece of copper that had been left outside...


...and had it been a bit of scenery and not the business end of a Land Raider I'd have probably left it as was. But as part of the model as a whole it had to be painted up more than it was, but I did leave some heavy verdigris on the underside to remind me of my best ever paint job the world will never see lol.


Other than that, I've done a little weathering to the stripes atop of the 'Raider...


... which still needs a little tiding up (but that's why it's called a WIP yeah?).

And I've been working on some custom track guards for a bit of chaotic extra armour (I'm a fan of "what you see is what you get" when it comes to my models), pics of those to come soon, but with the spawn due at the end of the week I could be away from my paints for a while so I'll try and squeeze in as much as I can between now and then.

C&C always welcome.

Take it easy, 

- Dave :)

Tuesday 2 August 2011

Quick 'n' Easy Verdigris (tutorial)

Not being a master painter like some of those out there, I've never thought to put any sort of tutorial together before now, but as I sat to start painting the symbol on my dozer blade, I remembered someone somewhere asking me how I painted my bronze.

As it's a simple process and one made of very definite steps (based on one in an old White Dwarf, I think from when the tower for Warhammer Siege was released?) and I thought it would be a good one for my first ever painting tutorial.

So without further adieu...

STEP 1)

Have a think about what it is you're painting, which areas do you want bronzed up?, how old is it? etc.


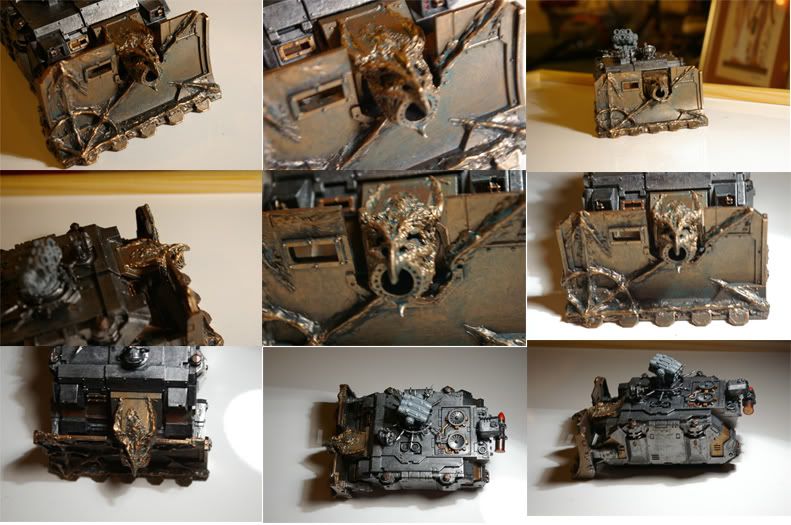
This is the unpainted dozer blade with my hand sculpted Star of Chaos. As you can see it's very rough around the edges, but I find that level of roughness lends itself well to Chaos. The chevrons are there as an undercoat for  the hazard stripes yet to come, and although they were painted before I sculpted the star (to help keep things aligned) they have little to no effect on this tutorial.

Being at the business end of a Land Raider it is bound to take many a knock and scrape, so it will be painted in a way to reflect this.

Also it has been retrofitted to the blade itself in a post-heresy scramble to adorn anything slightly imperialistic with spikes. This means that only the star will be painted in the brass/bronze and eventually blended in to look like it has been welded to the blade.

STEP 2)

Apply undercoat.


Goes without saying, but a good solid undercoat (in this case Chaos Black as we're dealing with metallics) will save you many a headache further down the line.


STEP 3)

The Base Coat


Slap on a Liberal Coating of Tin Bitz, leaving the odd "half drybrushed" spot here and there to ensure a bit of depth to the finished piece.


STEP 4)

GO GREEN!


This is where your Step 1 planning comes in.

I mix my Verdigris by slowly adding Enchanted Blue to Goblin Green until I get the desired colour, but this stage is really up to you. If you want a very bright green, add a bit of Skull White, if you want just a hint of green then add more blue, maybe some Chaos Black, or Dark Angel Green,


Have a google for verdigris and see what comes up, or if your more hands on, take a look under the sink at the copper pipes to see what's there. look at old statues, or maybe an old gate in a churchyard?

Once you're happy with your colour, build up the layers with a drybrush until you're happy with the amount of ageing. (I like to just slap it on everywhere, making sure I leave some of the Tin Bitz visible... you can always go back in and add more TB if you get too carried away).

If what you're painting is stationary, then maybe you might want to stop with just the green, and highlight as appropriate, but if, like my dozer blade, you think it's going to get a bit more of a polish then carry on to the next step.

STEP 5)

Polishing Off


In the Final step, I used a detail brush to pick out the raised details in a mixture of Brazen Brass and Bronze, with a healthy splashing of Devlan Mud to take the edge off and bring out the details.

Much like in step 4, how much you decide to bring back to the surface is up to you. The Chaos Star is a focal point of my model so I wanted it to stand out against the rest of the blade, so I opted for nice shiny brass (Keeps Lord Khorne happy too), but you can just as easily use shining gold for a more subtle effect, or even go back over the verdigris with more Tin Bitz to give a really aged effect, particularly good for stationary objects like statues and buildings.

However much you decide to make shiny/dull down, remember that the verdigris will always build up more in heavily recessed areas, so you should have a good look at your model, and in some cases add more verdigris in places you may have missed but you feel would be more likely to have a build up of verdigris.


And that as they say... is that.

I will of course be posting pics of the finished blade soon, and I'll come back and edit this post with a link to the finished product just to keep things together.


If you're still reading, thanks for bearing with me (this tutorial took longer to type than it did to paint lol), and I hope this has inspired you to go out and dirty up your shiny things.

- Dave :)

Sunday 31 July 2011

Stripy Goodness

I'm thinking I'm well overdue an update, so here I am... updating. Even if just to prove (to myself more than anyone else) that this isn't just another project that's going to get started and then lost in the warp (cupboard) with all the others.

Anyway, haven't had much modelling time lately (I won't bore you with the details), but I have started making some progress on the LandRaider.


As you can see I've been getting my stripe on, slowly but surely building up the bass coats (I like to paint in sections then glue everything into place when I'm happy... then just go round touching up the seams).


Unfortunately my daylight bulb packed in, so I can't get any good shots till morning. And excuse the sloppiness, I'm yet to go in with the second (third and probably fourth) coats of black, and tidy the whole thing up a bit (a lot).

I have also started building up some greenstuff on the blade.


The green is really just structural, as I'll probably go in with some miliput for the finer details, although I left it quite rough when I did similar work on my vindicator and that ended up looking suitably chaotic, so I'll decided when it's dry and I can have a good look without ruining it.


That's all for now, more updates when I get the light on my side.

C&C always welcome.

- Dave :)